The reproducibility crisis and open science
Overview
Teaching: 25 min
Exercises: 0 minQuestions
What is the reproducility crisi and how can be solved?
Objectives
Understand the Open Science movement
The Reproducibility Crisis
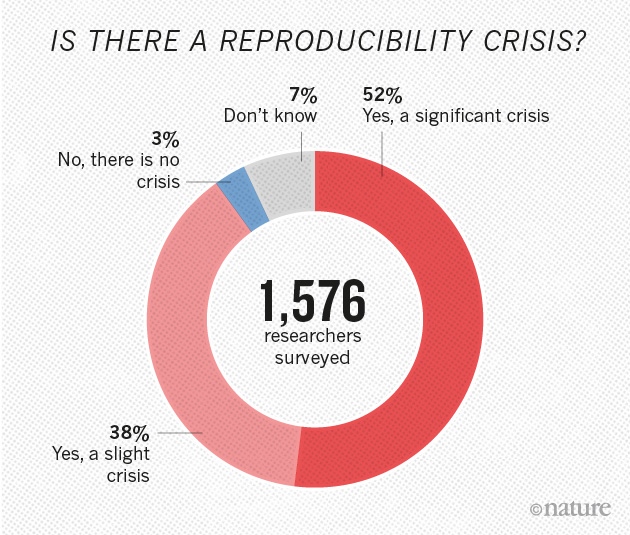
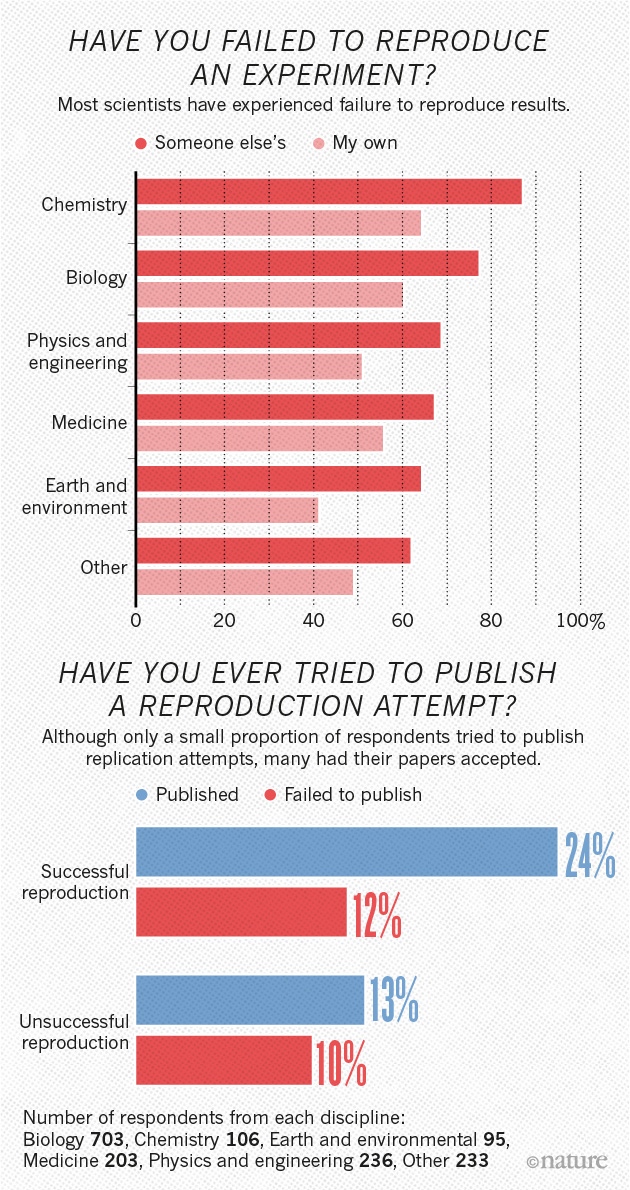
More than 70% of researchers have tried and failed to reproduce another scientist’s experiments, and more than half have failed to reproduce their own experiments. Those are some of the telling figures that emerged from Nature’s survey of 1,576 researchers who took a brief online questionnaire on reproducibility in research.
The data reveal sometimes-contradictory attitudes towards reproducibility. Although 52% of those surveyed agree that there is a significant ‘crisis’ of reproducibility, less than 31% think that failure to reproduce published results means that the result is probably wrong, and most say that they still trust the published literature.
Failing to reproduce results is a rite of passage, says Marcus Munafo, a biological psychologist at the University of Bristol, UK, who has a long-standing interest in scientific reproducibility. When he was a student, he says, “I tried to replicate what looked simple from the literature, and wasn’t able to. Then I had a crisis of confidence, and then I learned that my experience wasn’t uncommon.”
The challenge is not to eliminate problems with reproducibility in published work. Being at the cutting edge of science means that sometimes results will not be robust, says Munafo. “We want to be discovering new things but not generating too many false leads.”
The complete section is taken directly without any modifications from this aricle which is cited below:
Baker M. 1,500 scientists lift the lid on reproducibility. Nature. 2016 May 26;533(7604):452-4. doi: 10.1038/533452a. PMID: 27225100.
Open Science
Open research aims to transform research by making it more reproducible, transparent, reusable, collaborative, accountable, and accessible to society. It pushes for change in the way that research is carried out and disseminated by digital tools. One definition of open research, as given by the Organisation for Economic Co-operation and Development (OECD), is the practice of making “the primary outputs of publicly funded research results – publications and the research data – publicly accessible in a digital format with no or minimal restriction.” To achieve this openness in research, each element of the research process should:
- Be publicly available: It is difficult to use and benefit from knowledge hidden behind barriers such as passwords and paywalls.
- Be reusable: Research outputs need to be licensed appropriately, so that prospective users know any limitations on re-use.
- Be transparent: With appropriate metadata to provide clear statements of how research output was produced and what it contains.
The research process typically has the following form: data is collected and then analysed (usually using software). This process may involve the use of specialist hardware. The results of the research are then published. Throughout the process, it is good practice for researchers to document their working in notebooks. Open research aims to make each of these elements open:
- Open Data: Documenting and sharing research data openly for re-use.
- Open Source Software: Documenting research code and routines, and making them freely accessible and available.
- Open Hardware: Documenting designs, materials, and other relevant information related to hardware, and making them freely accessible and available.
- Open Access: Making all published outputs freely accessible for maximum use and impact.
- Open Notebooks: An emerging practice, documenting and sharing the experimental process of trial and error.
Open Science is a concept that extends open research further. It relates to making other aspects of scientific research open to the public, for example:
- Open educational resources: Making educational resources publicly available to be re-used and modified.
- Equity, diversity, inclusion: Ensuring scholarship is open to anyone without barriers based on factors such as race, background, gender, and sexual orientation.
- Citizen science: The inclusion of members of the public in scientific research.
These elements are also discussed in detail in this chapter.
Motivation and Background
There are five main schools of thought motivating open practices to benefit research:
| School | Belief | Aim |
|---|---|---|
| Infrastructure | Efficient research depends on the available tools and applications. | Creating openly available platforms, tools, and services for researchers. |
| Pragmatic | Knowledge-creation could be more efficient if researchers worked together. | Opening up the process of knowledge creation. |
| Measurement | Academic contributions today need alternative impact measurements. | Developing an alternative metric system for research impact. |
| Democratic | The access to knowledge is unequally distributed. | Making knowledge freely available for everyone. |
| Public | Research needs to be made accessible to the public. | Making research accessible for citizens. |
Another benefit of openness is that while research collaborations are essential to advancing knowledge, identifying and connecting with appropriate collaborators is not trivial. Open practices can make it easier for researchers to connect by increasing the discoverability and visibility of one’s work, facilitating rapid access to novel data and software resources, and creating new opportunities to interact with and contribute to ongoing communal projects.
The last two sections were taken directly without any modifications from _the turing way_book which is cited below:
The Turing Way Community, Becky Arnold, Louise Bowler, Sarah Gibson, Patricia Herterich, Rosie Higman, … Kirstie Whitaker. (2019, March 25). The Turing Way: A Handbook for Reproducible Data Science (Version v0.0.4). Zenodo. http://doi.org/10.5281/zenodo.3233986
Key Points
Open Science practices aims to transform research by making it more reproducible, transparent, reusable, collaborative, accountable, and accessible to society
Become a champion of open (data) science
Overview
Teaching: 30 min
Exercises: 60 minQuestions
How data scientist can apply open science practices in their work?
Objectives
To understand the importance to share data and code
To value code and data for what they are: the true foundations of any scientific statement.
To promote good practices for open & reproducible science
The Crisis of Confidence
As we discussed in the first part of the lesson, the crisis of confidence poses a general problem across most empirical research disciplines and is characterized by an alarmingly low rate of key findings that are reproducible (e.g., Fidler et al. 2017; Open Science Collaboration, 2015; Poldrack et al., 2017; Wager et at., 2009). A low reproducibility rate can arise when scientists do not respect the empirical cycle. Scientific research methods for experimental research are based on the hypothetico-deductive approach (see e.g., de Groot, 1969; Peirce, 1878), which is illustrated in Figure 1.
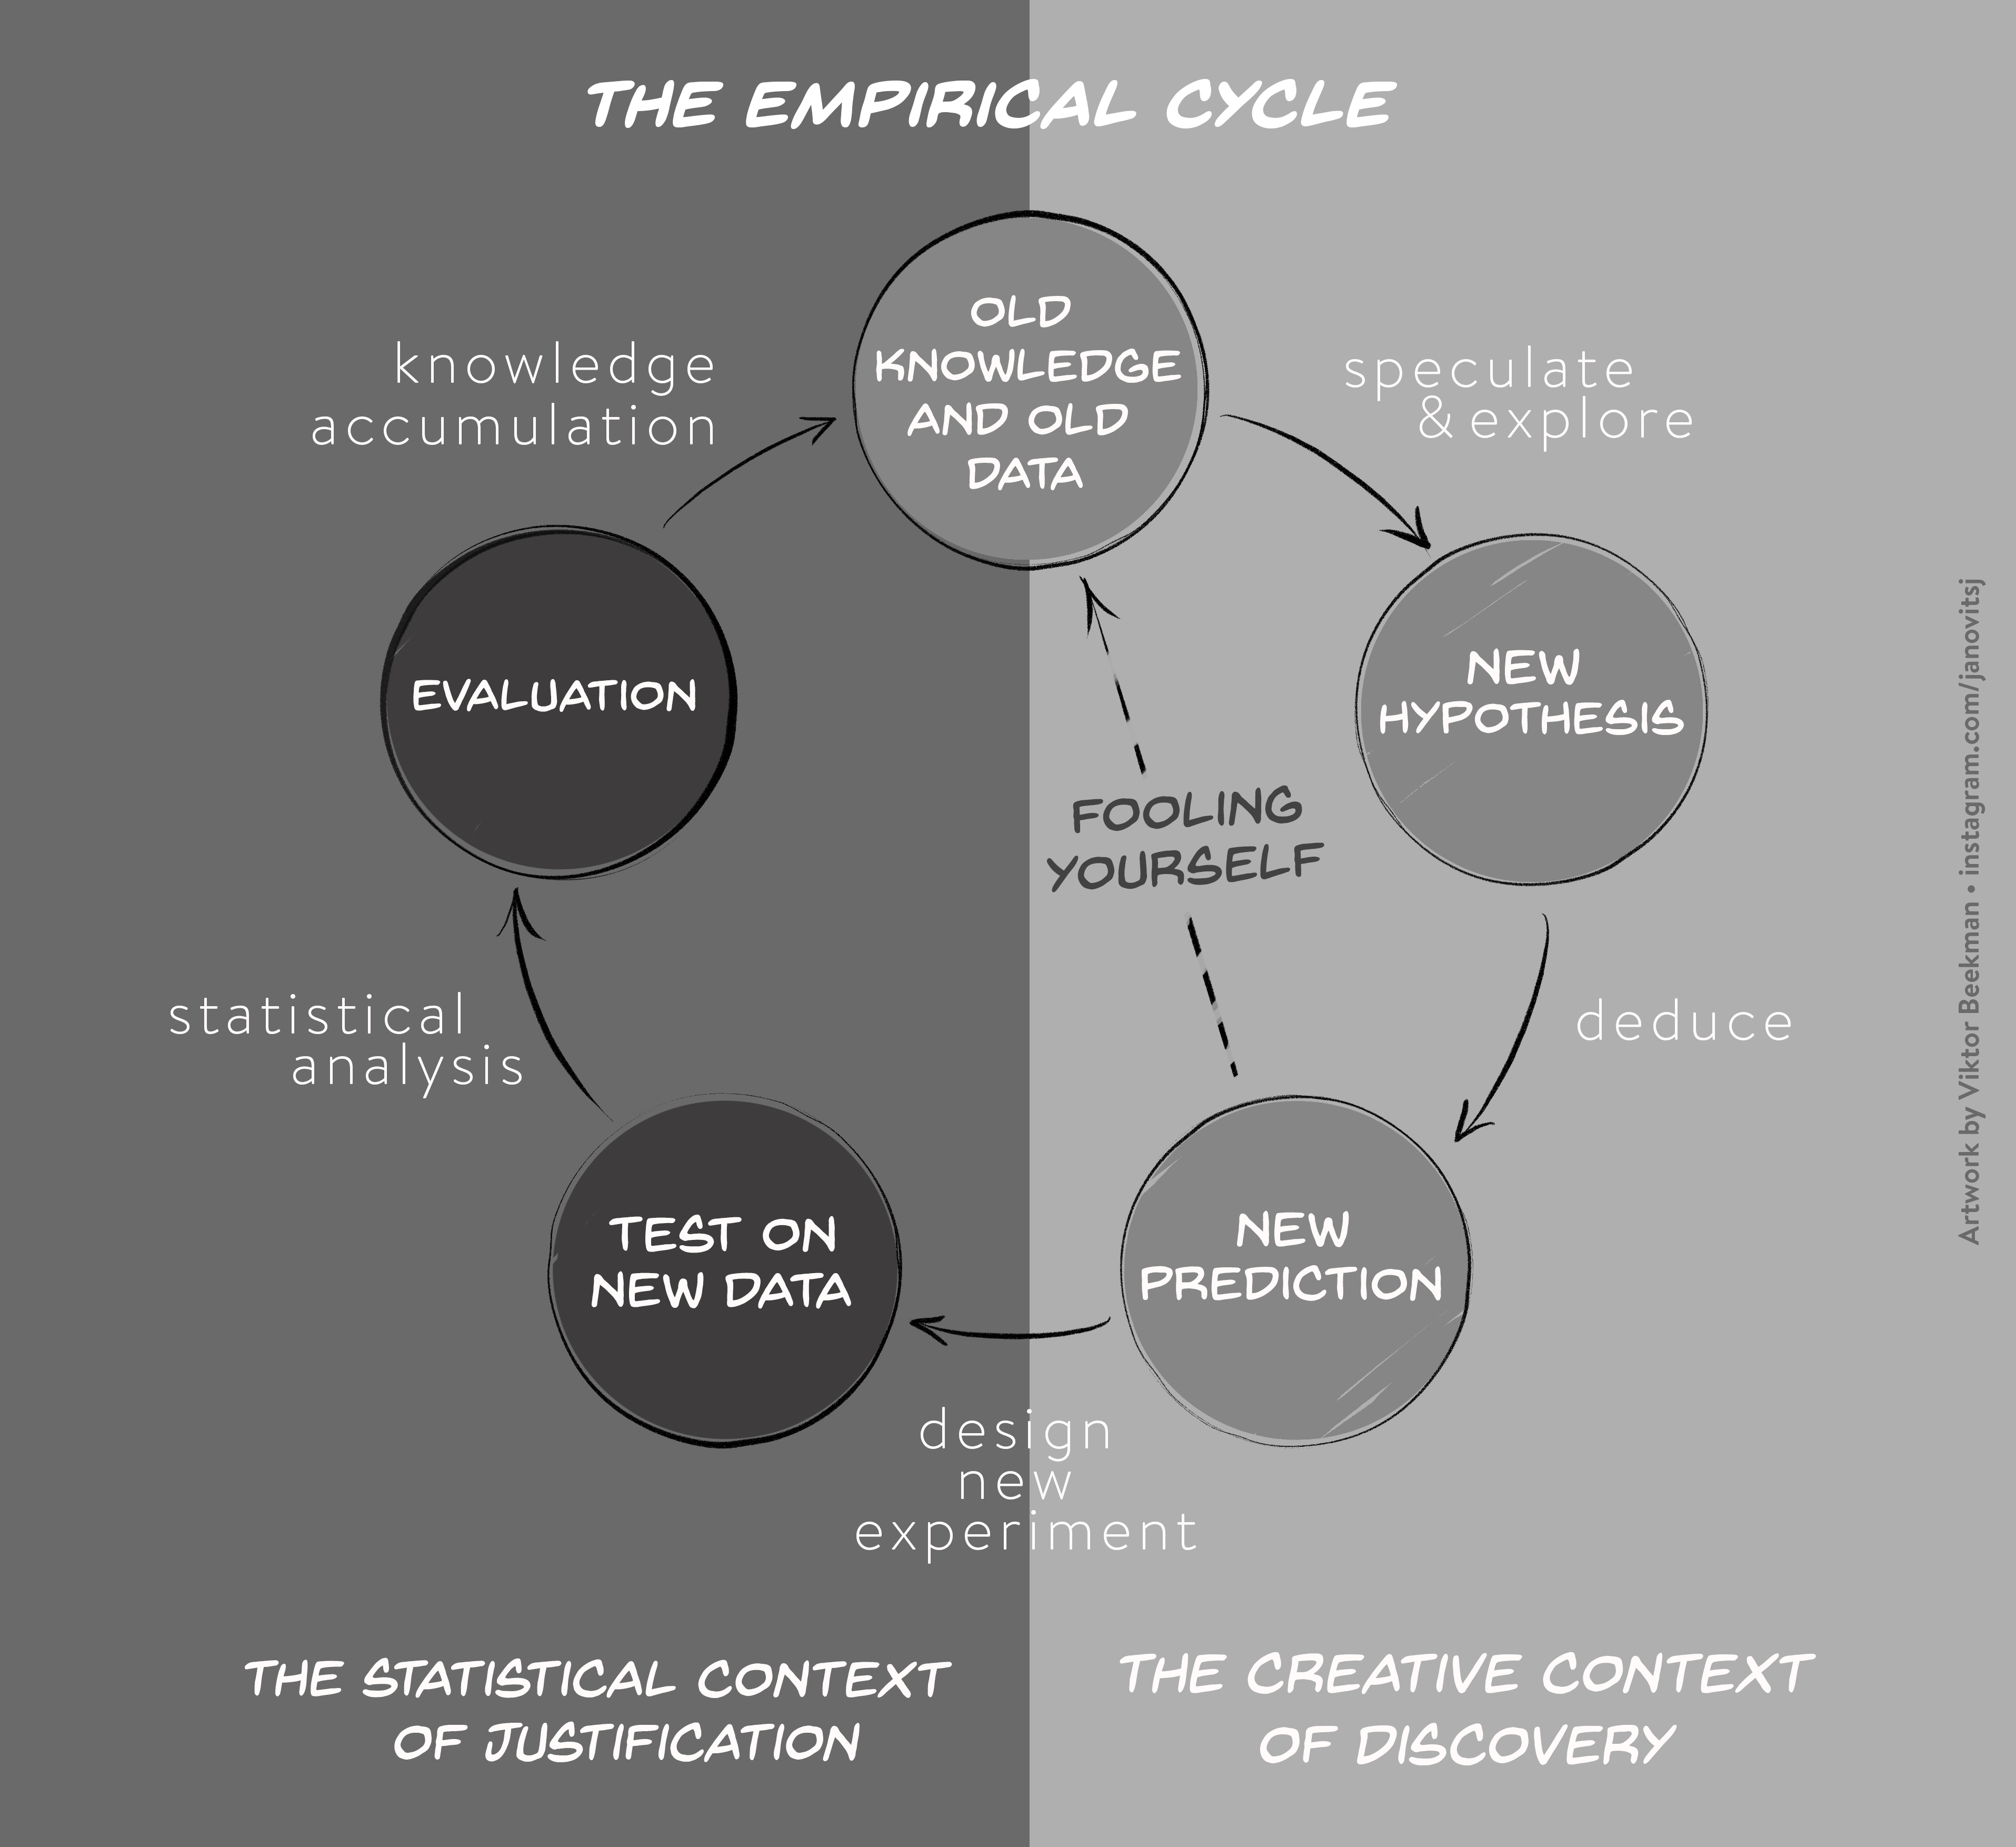
The empirical cycle suggests that scientists initially find themselves in “the creative context of discovery”, where the primary goal is to generate hypotheses and predictions based on exploration and data-dependent analyses. Subsequently, this initial stage of discovery is followed by “the statistical context of justification”. This is the stage of hypothesis-testing in which the statistical analysis must be independent of the outcome. Scientists may fool themselves whenever the results from the creative context of discovery with its data-dependent analyses are treated as if they came from the statistical context of justification. Since the selection of hypotheses now capitalizes on chance fluctuations, the corresponding findings are unlikely to replicate.
This suggests that the crisis of confidence is partly due to a blurred distinction between statistical analyses that are pre-planned and post-hoc, caused by the scientists degree of freedom in conducting the experiment, analyzing the data, and reporting the outcome. In a research environment with a high degree of freedom it is tempting to present the data exploration efforts as confirmatory (Carp, 2013). Kerr (1998, p. 204) attributed this biased reporting of favorable outcomes to an implicit effect of a hindsight bias: “After we have the results in hand and with the benefit of hindsight, it may be easy to misrecall that we had really ‘known it all along’, that what turned out to be the best post hoc explanation had also been our preferred a priori explanation.”
To overcome the crisis of confidence the research community must change the way scientists conduct their research. The alternatives to current research practices generally aim to increase transparency, openness, and reproducibility. Applied to the field of ecology, Ellison (2010, p. 2536) suggests that “repeatability and reproducibility of ecological synthesis requires full disclosure not only of hypotheses and predictions, but also of the raw data, methods used to produce derived data sets, choices made as to which data or data sets were included in, and which were excluded from, the derived data sets, and tools and techniques used to analyze the derived data sets.” To facilitate their uptake, however, it is essential that these open and reproducible research practices are concrete and practical.
Open and Reproducible Research Practices
In this section, we focus on open and reproducible research practices that researchers can implement directly into their workflow, such as data sharing, creating reproducible analyses, and the preregistration of studies.
Data Sharing
International collaboration is essential and thus the documentation, and archiving of large volume of (multinational) data and metadata is becoming increasingly important. Even though many scientists are reluctant to make their data publicly available, data sharing can increase the impact of their research. For instance, in cancer research, studies for which data were publicly available received higher citation rates compared to studies for which data were not available (Piwowar, Day, & Fridsma, 2007). This is due to the fact that other researchers can build directly on existing data, analyze them using utilize novel statistical techniques and modelling tools, and mine them from new perspectives (Carpenter et al., 2009).
Preregistration and Registered Reports
A blurred distinction between statistical analyses that are pre-planned and post-hoc causes many researchers to (unintentionally) use questionable research practices to produce significant findings (QRPs; John, Loewenstein, & Prelec, 2012). The most effective method to combat questionable research practices is preregistration, a procedure to curtail scientists’ degrees of freedom (e.g., Wagenmakers & Dutilh, 2016. When preregistering studies, scientists commit to an analysis plan in advance of data collection. By making a sharp distinction between hypothesis generating and analyzing the data, preregistration eliminates the confusion between exploratory and confirmatory research.
Over the last years, preregistration has quickly gained popularity and has established itself over several platforms and formats. Scientists can now choose to preregister their work either independently —for instance on platforms like https://asPredicted.org or the Open Science Framework (OSF)— or preregister their studies directly in a journal in the format of a Registered Report as promoted by Chris Chambers (2013). Currently about 200 journals —including Nature: Human Behaviour— accept Registered Reports either as a regular submission option or as part of a single special issue (see https://cos.io/rr/ for the full list).
Preregistration is encouraged in the transparency and openness promotion (TOP) guidelines (Nosek et al., 2015 and represents the standard for the analysis of clinical trials; for instance, in the New England Journal of Medicine —the world’s highest impact journal— the registration of Clinical Trials is a prerequisite for publication.
Reproducibility of Statistical Results
One of the core scientific values is reprodicibility. The reproducibility of experimental designs and methods allows the scientific community to determine the validity of alledged effects.
The benefit of publishing fully reporducible statistical results (including the reporting of all data preprocessing steps) is that collaborators, peer-reviewers, and independent researchers can repeat the analysis –from raw data and to the creation of relevant figures and tables– and verify the correctness of the results. Scientific articles are not free from typographical mistakes and it has been shown that the prevalence for statistical reporting errors is shockingly high. For instance, Nuijten et al. (2015) examined the prevalence of statistical reporting errors in the field of psychology and found that almost 50% or all psychological articles papers contain at least one error. These reporting errors can lead to erroneous substantive conclusions and influence, for instance, the results of meta-analyses. Most importantly, however, is that these errors are preventable. Through tools, such as git and RMarkdown, researchers can automate their statistical reporting and produce fully reproducible research papers.
The next section will explain how you can use version control and git to track your work history and collaborate with other researchers.
Three messages
If there are 3 things to communicate to others after this workshop, I think they would be:
1. Data science is a discipline that can improve your analyses
- There are concepts, theory, and tools for thinking about and working with data.
- Your study system is not unique when it comes to data, and accepting this will speed up your analyses.
This helps your science:
- Think deliberately about data: when you distinguish data questions from research questions, you’ll learn how and who to ask for help
- Save heartache: you don’t have to reinvent the wheel
- Save time: when you expect there’s a better way to do what you are doing, you’ll find the solution faster. Focus on the science.
2. Open data science tools exist
- Data science tools that enable open science are game-changing for analysis, collaboration and communication.
- Open science is “the concept of transparency at all stages of the research process, coupled with free and open access to data, code, and papers” (Hampton et al. 2015)
- For empirical researchers: transparency checklist (https://eltedecisionlab.shinyapps.io/TransparencyChecklist/)
- Repositories such as the Open Science Framework (https://osf.io/preregistration) offer preregistration templates and the tools to archive your projects
This helps your science:
- Blogpost: Seven Reasons To Work Reproducibly (written by the Center of Open Science): https://cos.io/blog/seven-reasons-work-reproducibly/
- Have confidence in your analyses from this traceable, reusable record
- Save time through automation, thinking ahead of your immediate task, reduced bookkeeping, and collaboration
- Take advantage of convenient access: working openly online is like having an extended memory _ Making your data and code publicly available can increase the impact of research.
3. Learn these tools with collaborators and community (redefined):
- Your most important collaborator is Future You.
- Community should also be beyond the colleagues in your field.
- Learn from, with, and for others.
This helps your science:
- If you learn to talk about your data, you’ll find solutions faster.
- Build confidence: these skills are transferable beyond your science.
- Be empathetic and inclusive and build a network of allies
Build and/or join a local coding community
Join existing communities locally and online, and start local chapters with friends!
Some ideas:
-
Saudi Open Science Community. This community aims to provide a place where newcomers and experienced peers interact and inspire each other to embed open science practices and values in their workflows. They are also encouraged to give feedback on policies, infrastructures and support services. It was established recently in Feb 2021.
-
RLadies. Informal but efficient communities centered on R data analysis meant to be inclusive and supportive. There is a local chapter for RLadies Saudi Arabia (Dammam) where at least one workshop is delivered each month.
-
The turing way. The Turing Way is an open source community-driven guide to reproducible, ethical, inclusive and collaborative data science. The book has a guide for reproducibility, covering version control, testing, and continuous integration.
These meetups can be for skill-sharing, showcasing how people work, or building community so you can troubleshoot together. They can be an informal “hacky hour” at a cafe or pub!
All the materials for this episode is taken directly (with minor changes) from the Introduction to Open Data Science with R workshop in the The Carpentries Incubator. At the time of completing this workshop, Marc Gallland, Tijs Bliek and Stijn Van Hoey are listed as the authors of the lesson in The Carpentries Incubator.
Key Points
Make your data and code available to others
Make your analyses reproducible
Make a sharp distincion between exploratory and confirmatory research
Intro to Version Control with Git
Overview
Teaching: 30 min
Exercises: 5 minQuestions
How do I use git to keep a record of my project?
Objectives
Explain the purpose of version control.
Introduce common git commands.
Understand how to view and check out previous versions of files.
Prerequisites
- Created GitHub account (described in set-up)
- Configured git (described in set-up)
- The
molecoolfolder that we installed in the set-up
Version Control
Version control keeps a complete history of your work on a given project. It facilitates collaboration on projects where everyone can work freely on a part of the project without overriding others’ changes. You can move between past versions and rollback when needed. Also, you can review the history of your project through commit messages that describe changes on the source code and see what exactly has been modified in any given commit. You can see who made the changes and when it happened.
This is greatly beneficial whether you are working independently or within a team.
git vs. GitHub
gitis the software used for version control, while GitHub is a hosting service. You can usegitlocally (without using an online hosting service), or you can use it with other hosting services such as GitLab or BitBucket. Other examples of version control software include SVN and Mercurial.
We recommends using the software git for version control, and GitHub as a hosting service, though there are other options.
Recommended Hosting Service: GitHub
Other hosting Services: GitLab, BitBucket
Making Commits
You should have git installed and configured from the setup instructions.
In this section, we are going to edit files in the molecool folder that we installed in the set-up, and use git to track those changes.
First, use a terminal to cd into the top directory of the local repository.
In order for git to keep track of your project, or any changes in your project, you must first tell it that you want it to do this. You must manually create check-points in your project if you wish to have points to return to.
The molecool folder was created with a programme called CookieCutter, which initialize git automatically. However, if you are creating your own directory without CookieCutter, you should first initialize your project (ie tell git that you were working on a project) using the command git init.
CookieCutter, which was used to create molcool, it initialized the use of git for us, added our files, and made a commit (how convenient!). We can see this by typing the following into the terminal on Linux or Mac. More information about CookieCutter is included here.
$ ls -la
Here, the -la says that we want to list the files in long format (-l), and show hidden files (-a).
If you are on Windows and using the Anaconda Prompt:
dir /a
If you are on Windows and using the Anaconda PowerShell Prompt:
> ls -hidden
You should an output called .git, .git is a directory where git stores the repository data. This is one way that we are in a git repository.
Next, type
$ git status
On branch master
nothing to commit, working tree clean
This tells us that we are on the master branch (more about branching later), and that no files have been changed since the last commit.
Next, type
$ git log
You will get an output resembling the following. This is something called your git commit log. Whenever you make a version, or checkpoint, of your project, you will be able to see information about that checkpoint using the git log command. The cookie cutter has already made a commit and written a message for you, and that is what we see for this first commit in the log.
commit 25ab1f1a066f68e433a17454c66531e5a86c112d (HEAD -> master, tag: 0.0.0)
Author: Your Name <your_email@something.com>
Date:   Mon Feb 4 10:45:26 2019 -0500

    Initial commit after CMS Cookiecutter creation, version 1.0
Each line of this log tells you something important about the commit, or check point that exists for the project. On the first line,
commit 25ab1f1a066f68e433a17454c66531e5a86c112d (HEAD -> master, tag: 0.0.0)
You have a unique identifier for the commit (25ab1…). You can use this number to reference this checkpoint.
Then, git records the name of the author who made the change.
Author: Your Name <your_email@something.com>
This should be your information. This way, anyone who downloads this project can see who made each commit. Note that this name and email address matches what you specified when you configured git in the setup, with the name and email address you specified in the cookiecutter having no effect.
Date: Mon Feb 4 10:45:26 2019 -0500
Next, it lists the date and time the commit was made.
Initial commit after CMS Cookiecutter creation, version 1.0
Finally, there will be a blank line followed by a commit message. The commit message is a message whoever made the commit chose to write, but should describe the change that took place when the commit was made. This commit message was written by the cookiecutter for you.
When we have more commits (or versions) of our code, git log will show a history of these commits, and they will all have the same format discussed above. Right now, we have only one commit - the one created by the CMS CookieCutter.
The 3 steps of a commit
Now, we will change some files and use git to track those changes. Let’s edit our README. Open README.md in your text editor of choice. On line 8, you should see the description of the repository we typed when running the CookieCutter. Add the following sentence to your README under the initial description and save the file.
This repository is currently under development. To do a developmental install, download this repository and type

`pip install -e .`

in the repository directory.
git add, git status, git commit
Making a commit is like making a checkpoint for a particular version of your code. You can easily return to, or revert to that checkpoint.
To create the checkpoint, we first have to make changes to our project. We might modify many files at a time in a repository. Thus, the first step in creating a checkpoint (or commit) is to tell git which files we want to include in the checkpoint. We do this with a command called git add. This adds files to what is called the staging area.
Let’s look at our output from git status again.
On branch master
Changes not staged for commit:
  (use "git add <file>..." to update what will be committed)
  (use "git checkout -- <file>..." to discard changes in working directory)

        modified:   README.md

no changes added to commit (use "git add" and/or "git commit -a")
Git even tells us to use git add to include what will be committed. Let’s follow the instructions and tell git that we want to create a checkpoint with the current version of README.md
$ git add README.md
$ git status
On branch master
Changes to be committed:
  (use "git reset HEAD <file>..." to unstage)

        modified:   README.md
We are now on the second step of creating a commit. We have added our files to the staging area. In our case, we only have one file in the staging area, but we could add more if we needed.
To create the checkpoint, or commit, we will now use the git commit command. We add a -m after the command for “message.” Whenever you create a commit, you should write a message about what the commit does.
$ git commit -m "update readme to have instructions for developmental install"
Now when we look at our log using git log, we see the commit we just made along with information about the author and the date of the commit.
Let’s continue to edit this readme to include more information. This is a file which will describe what is in this directory. Open README.md in your text editor of choice and add the following to the end
This package requires the following:
  - numpy
  - matplotlib
This file is using a language called markdown.
Check your understanding
Create a commit for these changes to your repository.
Answer
To add the file to the staging area and tell
gitwe would like to track the changes to the file, we first use thegit addcommand.$ git add README.mdNow the file is staged for a commit. Next, create the commit using the
git commitcommand.$ git commit -m "add information about dependencies to readme"
Once you have saved this file, type
$ git log
Now, check git status and git log. You should see the following:
$ git status
On branch master
nothing to commit, working tree clean
$ git log
We now have a log with three commits. This means there are three versions of the repository we are working in.
git log lists all commits made to a repository in reverse chronological order.
The listing for each commit includes the commit’s full identifier,the commit’s author, when it was created, and the commit title.
We can see differences in files between commits using git diff.
$ git diff HEAD~1
Here HEAD refers to the point in our commit history (and current branch). When we use ~1, we are asking git to show us the different of the current point minus one commit.
Lines that have been added are indicated in green with a plus sign next to them (‘+’), while lines that have been deleted are indicated in red with a minus sign next to them (‘-‘)
Viewing out previous versions
If you need to check out a previous version
$ git checkout COMMIT_ID
This will temporarily revert the repository to whatever the state was at the specified commit ID.
Let’s checkout the version before we made the most recent edit to the README.
$ git log --oneline
d857c74 (HEAD -> master) add information about dependencies to readme
3c0e1c6 update readme to have instructions for developmental install
116f0cf (tag: 0.0.0) Initial commit after CMS Cookiecutter creation, version 1.1
In this log, the commit ID is the first number on the left.
To revert to the version of the repository where we first edited the readme, use the git checkout command with the appropriate commit id.
$ git checkout 3c0e1c6
If you now view your readme, it is the previous version of the file.
To return to the most recent point,
$ git checkout master
Exercise
What list of commands would mimic what CMS CookieCutter did when it created the repository and performed the first commit? (hint - to initialize a repository, you use
git init)Solution
To recreate the CMS Cookiecutter’s first commit exactly,
$ git init
$ git add .
$ git commit -m "Initial commit after CMS Cookiecutter creation, version 1.0"
The first line initializes the
gitrepository. The second line add all modified files in the current working directory, and the third line commits these files and writes the commit message.
Creating new features - using branches
When you are working on a project to implement new features, it is a good practices to isolate the the changes you are making and work on one particular topic at a time. To do this, you can use something called a branch in git. Working on branches allows you to isolate particular changes. If you make sure that your code works before merging to your main or master branch, you will ensure that you always have a working version of code on your main branch.
By default, you are typically in the master branch. To create a new branch and move to it, you can use the command
$ git checkout -b new_branch_name
The command git checkout switches branches when followed by a branch name. When you use the -b option, git will create the branch and switch to it. For this exercise, we will add a new feature - we are going to add another function to print the Zen of Python.
First, we’ll create a new branch:
$ git checkout -b zen
Next, add a new function to your functions.py module. We are going to add the ability to print “The Zen of Python”. You can get the Zen of Python by typing
import this
into the interactive Python prompt
def zen(with_attribution=True):
    quote = """Beautiful is better than ugly.
    Explicit is better than implicit.
    Simple is better than complex.
    Complex is better than complicated.
    Flat is better than nested.
    Sparse is better than dense.
    Readability counts.
    Special cases aren't special enough to break the rules.
    Although practicality beats purity.
    Errors should never pass silently.
    Unless explicitly silenced.
    In the face of ambiguity, refuse the temptation to guess.
    There should be one-- and preferably only one --obvious way to do it.
    Although that way may not be obvious at first unless you're Dutch.
    Now is better than never.
    Although never is often better than *right* now.
    If the implementation is hard to explain, it's a bad idea.
    If the implementation is easy to explain, it may be a good idea.
    Namespaces are one honking great idea -- let's do more of those!"""

    if with_attribution:
      quote += "\n\tTim Peters"

    return quote
Verify that this function works in the interactive Python prompt. Next, commit this change:
$ git add .
$ git commit -m "add function to print Zen of Python
Let’s switch back to the master branch to see what it is like. You can see a list of all the branches in your repo by using the command
$ git branch
This will list all of your branches. The active branch, or the branch you are on will be noted with an asterisk (*).
To switch back to the master branch,
$ git checkout master
When you look at the functions.py module on the master branch, you should not see your most recent changes.
You can verify this by using the git log command.
Consider that at the same time we have some changes or features we’d like to implement. Let’s make a branch to do a documentation update.
Create a new branch
$ git checkout -b doc_update
Let’s add some information about developing on branches to the README. Update your README to include this information:
Features should be developed on branches. To create and switch to a branch, use the command

`git checkout -b new_branch_name`

To switch to an existing branch, use

`git checkout new_branch_name`
Save and commit this change.
To incorporate these changes in master, you will need to do a git merge. When you do a merge, you should be on the branch you would like to merge into. In this case, we will first merge the changes from our doc_update branch, then our zen branch, so we should be on our master branch. Next we will use the git merge command.
The syntax for this command is
$ git merge branch_name
where branch_name is the name of the branch you would like to merge.
We can merge our doc_update branch to get changes on our master branch:
$ get merge doc_update
Now our changes from the branch are on master.
We can merge our zen branch to get our changes on master:
$ git merge zen
This time, you will see a different message, and a text editor will open for a merge commit message.
Merge made by the 'recursive' strategy.
This is because master and zen had development histories which have diverged. Git had to do some work in this case to merge the branches. A merge commit was created.
Merge commits create a branched git history. We can visualize the history of our project by adding --graph. There are other workflows you can use to make the commit history more linear, but we will not discuss them in this course.
Once we are done with a feature branch, we can delete it:
$ git branch -d zen
Using Branches - Exercise
For this exercise, you will be adding all the functions from your Jupyter notebook to the package. Create a branch to add your functions. Add all of the functions from your Jupyter notebook to the module
functions.pyin your package. Verify that you can use your functions. Once the functions are added and working, merge into your master branch.Solution
First, create a new branch in your repository
$ git checkout -b add-functionsNext, copy all of your imports from the first cell of your Jupyter notebook and paste them into the top of your file.
Next, copy the function definitions from the first cell and paste them above or below the
canvasfunction.Your file should look something like this.
"""
functions.py
A Python package for analyzing and visualizing xyz files. For MolSSI Workshop Python Package development workshop.

Handles the primary functions
"""

import os
import numpy as np
import matplotlib.pyplot as plt

from mpl_toolkits.mplot3d import Axes3D


def canvas(with_attribution=True):
    """
    Placeholder function to show example docstring (NumPy format)

    Replace this function and doc string for your own project

    Parameters
    ----------
    with_attribution : bool, Optional, default: True
        Set whether or not to display who the quote is from

    Returns
    -------
    quote : str
        Compiled string including quote and optional attribution
    """

    quote = "The code is but a canvas to our imagination."
    if with_attribution:
        quote += "\n\t- Adapted from Henry David Thoreau"
    return quote

def zen():
    quote = """Beautiful is better than ugly.
    Explicit is better than implicit.
    Simple is better than complex.
    Complex is better than complicated.
    Flat is better than nested.
    Sparse is better than dense.
    Readability counts.
    Special cases aren't special enough to break the rules.
    Although practicality beats purity.
    Errors should never pass silently.
    Unless explicitly silenced.
    In the face of ambiguity, refuse the temptation to guess.
    There should be one-- and preferably only one --obvious way to do it.
    Although that way may not be obvious at first unless you're Dutch.
    Now is better than never.
    Although never is often better than *right* now.
    If the implementation is hard to explain, it's a bad idea.
    If the implementation is easy to explain, it may be a good idea.
    Namespaces are one honking great idea -- let's do more of those!"""

    return quote

def calculate_distance(rA, rB):
    d=(rA-rB)
    dist=np.linalg.norm(d)
    return dist

def open_pdb(f_loc):
    with open(f_loc) as f:
        data = f.readlines()
    c = []
    sym = []
    for l in data:
        if 'ATOM' in l[0:6] or 'HETATM' in l[0:6]:
            sym.append(l[76:79].strip())
            c2 = [float(x) for x in l[30:55].split()]
            c.append(c2)
    coords = np.array(c)
    return sym, coords

atomic_weights = {
    'H': 1.00784,
    'C': 12.0107,
    'N': 14.0067,
    'O': 15.999,
    'P': 30.973762,
    'F': 18.998403,
    'Cl': 35.453,
    'Br': 79.904,
}


def open_xyz(file_location):

    # Open an xyz file and return symbols and coordinates.
    xyz_file = np.genfromtxt(fname=file_location, skip_header=2, dtype='unicode')
    symbols = xyz_file[:,0]
    coords = (xyz_file[:,1:])
    coords = coords.astype(np.float)
    return symbols, coords

def write_xyz(file_location, symbols, coordinates):

    num_atoms = len(symbols)

    with open(file_location, 'w+') as f:
        f.write('{}\n'.format(num_atoms))
        f.write('XYZ file\n')

        for i in range(num_atoms):
            f.write('{}\t{}\t{}\t{}\n'.format(symbols[i],
                                              coordinates[i,0], coordinates[i,1], coordinates[i,2]))

def draw_molecule(coordinates, symbols, draw_bonds=None, save_location=None, dpi=300):

    # Create figure
    fig = plt.figure()
    ax = fig.add_subplot(111, projection='3d')

    # Get colors - based on atom name
    colors = []
    for atom in symbols:
        colors.append(atom_colors[atom])

    size = np.array(plt.rcParams['lines.markersize'] ** 2)*200/(len(coordinates))

    ax.scatter(coordinates[:,0], coordinates[:,1], coordinates[:,2], marker="o",
               edgecolors='k', facecolors=colors, alpha=1, s=size)

    # Draw bonds
    if draw_bonds:
        for atoms, bond_length in draw_bonds.items():
            atom1 = atoms[0]
            atom2 = atoms[1]

            ax.plot(coordinates[[atom1,atom2], 0], coordinates[[atom1,atom2], 1],
                    coordinates[[atom1,atom2], 2], color='k')

    plt.axis('square')

    # Save figure
    if save_location:
        plt.savefig(save_location, dpi=dpi, graph_min=0, graph_max=2)

    return ax

def calculate_angle(rA, rB, rC, degrees=False):
    AB = rB - rA
    BC = rB - rC
    theta=np.arccos(np.dot(AB, BC)/(np.linalg.norm(AB)*np.linalg.norm(BC)))

    if degrees:
        return np.degrees(theta)
    else:
        return theta

def bond_histogram(bond_list, save_location=None, dpi=300, graph_min=0, graph_max=2):

    lengths = []
    for atoms, bond_length in bond_list.items():
        lengths.append(bond_length)

    bins = np.linspace(graph_min, graph_max)

    fig = plt.figure()
    ax = fig.add_subplot(111)

    plt.xlabel('Bond Length (angstrom)')
    plt.ylabel('Number of Bonds')


    ax.hist(lengths, bins=bins)

    # Save figure
    if save_location:
        plt.savefig(save_location, dpi=dpi)

    return ax

def build_bond_list(coordinates, max_bond=1.5, min_bond=0):

    # Find the bonds in a molecule
    bonds = {}
    num_atoms = len(coordinates)

    for atom1 in range(num_atoms):
        for atom2 in range(atom1, num_atoms):
            distance = calculate_distance(coordinates[atom1], coordinates[atom2])
            if distance > min_bond and distance < max_bond:
                bonds[(atom1, atom2)] = distance

    return bonds

atom_colors = {
    'H': 'white',
    'C': '#D3D3D3',
    'N': '#add8e6',
    'O': 'red',
    'P': '#FFA500',
    'F': '#FFFFE0',
    'Cl': '#98FB98',
    'Br': '#F4A460',
    'S': 'yellow'
}


if __name__ == "__main__":
    # Do something if this file is invoked on its own
    print(canvas())
Open the interactive Python interface and try out some functions to verify that your package still works.
Make a commit to commit this change to your branch:
$ git add .
$ git commit -m "add functions to package"
Next, switch back to your master branch to merge:
$ git checkout master
$ git merge add-functions
This materials were taken directly from Python Package Best Practices lesson by by the Molecular Sciences Software Institute (MolSSI).
Nash, J., Altarawy, D., Barnes, T., Ellis, S., Marin Rimoldi, E., Pritchard, B., & Smith, D. (2018). Best Practices in Python Package Development (Version 2020.12.0). The Molecular Sciences Software Institute. https://doi.org/10.34974/2H9M-0E15
More Tutorials
If you want more git, see the following tutorials.
Basic git
- Software Carpentry Version Control with Git
- GitHub 15 Minutes to Learn Git
- More on branches and merging
- Git Commit Best Practices
Key Points
Git provides a way to track changes in your project.
Git is a software for version control, and is separate from GitHub.
Using GitHub
Overview
Teaching: 30 min
Exercises: 5 minQuestions
How do I use git and GitHub?
Objectives
Explain reasons to use GitHub.
Putting your repository on GitHub.
Now, let’s put this project on GitHub so that we can share it with others. In your browser, navigate to github.com. Log in to you account if you are not already logged in. On the left side of the page, click the green button that says New to create a new repository. Give the repository the name molecool.
Note for the last question, “Initialize this repository with a README”. We will leave this unchecked in our case because we have an existing repository (as described by GitHub, “This will let you immediately clone the repository to your computer. Skip this step if you’re importing an existing repository.”). If you were creating the repository on GitHub, you would select this. There are also options for adding a .gitignore file or a license. However, since cookiecutter created these for us, we will not add them.
Click Create repository.
Now, GitHub very helpfully gives us directions for how to get our code on GitHub.
Before we follow these directions, let’s look at a few things in the repository. When you want to be able to put your code online in a repository, you have to add what git calls remotes. Currently, our repository has no remotes. See this by typing
$ git remote -v
You should see no output. Now, follow the instructions on GitHub under “…or push an existing repository from the command line”
$ git remote add origin https://github.com/YOUR_GITHUB_USERNAME/molecool.git
dgit branch -M main
git push -u origin main
The first command adds a remote named origin and sets the URL to our repository. The word origin here is simply a word that is a shortcut for the location of our repository. We could have called it anything (like pickle, or banana, or anything we wanted), but origin is used by convention. Now, whenever we say origin, git knows that we really mean https://github.com/YOUR_GITHUB_USERNAME/molecool.git.
The second command changes our primary branch name from master to main. GitHub recently decided (as of June 2020) to switch the name of your main branch from master to main. However, the git software will still name your primary (or first) branch master. After the second command, you will no longer see master when using the command git branch (instead seeing main).
The third command copies (or “pushes”) everything which we have tracked using git to origin. The word main means we are pushing the main branch.
Now if you refresh the GitHub webpage you should be able to see all of the new files you added to the repository.
Working With Multiple Repositories
One of the most potentially frustrating problems in data analysis and software development is keeping track of all the different copies of the code. For example, we might start a project on a local desktop computer, switch to working on a laptop during a conference, and then do performance optimization on a supercomputer. In ye olden days, switching between computers was typically accomplished by copying files via a USB drive, or with ssh, or by emailing things to oneself. After copying the files, it was very easy to make an important change on one computer, forget about it, and go back to working on the original version of the code on another computer. Of course, when collaborating with other people these problems get dramatically worse.
Git greatly simplifies the process of having multiple copies of a code development project. Let’s see this in action by making another clone of our GitHub repository. For this next exercise you must first navigate out of your project folder.
$ cd ../
$ git status
Before continuing to the next command, make sure you see the following output:
fatal: Not a git repository (or any of the parent directories): .git
If you do not get this message, do cd ../ until you see it.
Next, make another copy of your repository. We’ll use this to simulate working on another computer.
$ git clone https://github.com/YOUR_GITHUB_USERNAME/molecool.git molecool_friend
$ cd molecool_friend
Check the remote on this repository. Notice that when you clone a repository from GitHub, it automatically has that repository listed as origin, and you do not have to add
the remote the way we did when we did not clone the repository.
$ git remote -v
origin  https://github.com/YOUR_GITHUB_USERNAME/molecool.git (fetch)
origin  https://github.com/YOUR_GITHUB_USERNAME/molecool.git (push)
Create the file testing.txt in this new directory and make it contain the following.
I added this file from a new clone!
Now we will commit this new file:
$ git status
On branch main
Your branch is up to date with 'origin/main'.

Untracked files:
  (use "git add <file>..." to include in what will be committed)

  testing.txt

nothing added to commit but untracked files present (use "git add" to track)
$ git add .
$ git status
git add
Here, we’ve used
git add .instead ofgit add testing.txt. Using this command will add all untracked or changed files.
On branch main
Your branch is up to date with 'origin/main'.

Changes to be committed:
  (use "git reset HEAD <file>..." to unstage)

  new file:   testing.txt
$ git commit -m "Adds testing.txt"
$ git log
Now push the commit:
$ git push
If you check the GitHub page, you should see the testing.txt file.
Now change directories into the original local clone, and check if testing.txt is there:
$ cd ../<original clone>
$ ls -l
To get the newest commit into this clone, we need to pull from the GitHub repository:
$ git pull origin main
remote: Enumerating objects: 4, done.
remote: Counting objects: 100% (4/4), done.
remote: Compressing objects: 100% (1/1), done.
remote: Total 3 (delta 1), reused 3 (delta 1), pack-reused 0
Unpacking objects: 100% (3/3), done.
From https://github.com/YOUR_GITHUB_USERNAME/molecool
 * branch            main     -> FETCH_HEAD
   2ac4843..754da2b  main     -> origin/main
Updating 2ac4843..754da2b
Fast-forward
 testing.txt | 1 +
 1 file changed, 1 insertion(+)
 create mode 100644 testing.txt
Now we can actually see testing.txt in our original repository.
Exploring History
In your original repository, open the testing.txt file and add the following line to the end of the file.
I added this file from a new clone!
This line doesn't add any value.
When working on a project, it is easy to forget exactly what changes we have made to a file. To check this, do
$ git diff HEAD testing.txt
diff --git a/testing.txt b/testing.txt
index 166776a..a634bfb 100644
--- a/testing.txt
+++ b/testing.txt
@@ -1 +1,3 @@
 I added this file from a new clone!
+This line doesn't add any value.
+
“HEAD” just means the most recent commit. To compare against the commit just before the most recent commit, add “~1” to end of “HEAD”:
$ git diff HEAD~1 testing.txt
diff --git a/testing.txt b/testing.txt
new file mode 100644
index 0000000..a634bfb
--- /dev/null
+++ b/testing.txt
@@ -0,0 +1,3 @@
+I added this file from a new clone!
+This line doesn't add any value.
+
If we want to compare against a specific commit, we can first do “git log” to find the commit’s ID, and then do:
$ git diff *commit_id* testing.txt
Another problem that we sometimes encounter is wanting to undo all of our changes to a particular file. This can be done with
$ git checkout HEAD testing.txt
$ cat testing.txt
I added this file from a new clone!
Of course, you could also replace HEAD here with HEAD~1 or a specific commit ID.
Ignoring Files
Sometimes while you work on a project, you may end up creating some temporary files.
For example, if your text editor is Emacs, you may end up with lots of files called <filename>~.
By default, Git tracks all files, including these.
This tends to be annoying, since it means that any time you do “git status”, all of these unimportant files show up.
We are now going to find out how to tell Git to ignore these files, so that it doesn’t keep telling us about them ever time we do “git status”.
Even if you aren’t working with Emacs, someone else working on your project might, so let’s do the courtesy of telling Git not to track these temporary files.
First, lets ensure that we have a few dummy files. Make empty files called testing.txt~ and README.md~ in your repository using your text editor of choice.
While we’re at it, also make some other files that aren’t important to the project. Make a file called calculation.out in molecool/data using your text editor of choice.
Now check what Git says about these files:
$ git status
On branch main
Your branch is up to date with 'origin/main'.

Untracked files:
  (use "git add <file>..." to include in what will be committed)

	README.md~
	molecool/data/calculation.in
	molecool/data/calculation.out
	testing.txt~

nothing added to commit but untracked files present (use "git add" to track)
Now we will make Git stop telling us about these files.
Earlier, when we looked at the hidden files, you may have noticed a file called .gitignore. Cookiecutter created this for us, however, GitHub also has built in .gitignore files you can add when creating an empty repository.
This file is to tell git which types of files we would like to ignore (thus the name .gitignore)
Look at the contents of .gitignore
# Byte-compiled / optimized / DLL files
__pycache__/
*.py[cod]
*$py.class

# C extensions
*.so

# Distribution / packaging
.Python
env/
build/
develop-eggs/
dist/
downloads/
eggs/
.eggs/
lib/
lib64/
parts/
sdist/
var/
wheels/
*.egg-info/
.installed.cfg
*.egg

# PyInstaller
#  Usually these files are written by a python script from a template
#  before PyInstaller builds the exe, so as to inject date/other infos into it.
*.manifest
*.spec

...
Git looks at .gitignore and ignores any files or directories that match one of the lines.
Add the following to the end of .gitignore:
# emacs
*~

# temporary data files
*.in
*.out
Now do “git status” again. Notice that the files we added are no longer recognized by git.
$ git status
On branch main
Your branch is up to date with 'origin/main'.

Changes not staged for commit:
  (use "git add <file>..." to update what will be committed)
  (use "git checkout -- <file>..." to discard changes in working directory)

	modified:   .gitignore

no changes added to commit (use "git add" and/or "git commit -a")
We want these additions to .gitignore to become a permanent part of the repository, so do
$ git add .gitignore
$ git commit -m "Ignores Emacs temporary files and data directory"
$ git push
One nice feature of .gitignore is that prevents us from accidentally adding a file that shouldn’t be part of the repository. For example:
$ git add data/calculation.in
The following paths are ignored by one of your .gitignore files:
data/calculation.in
Use -f if you really want to add them.
It is possible to override this with the “-f” option for git add.
Conflict Resolution
Now we will make a few new edits to testing.txt:
Add a dummy header and footer the testing.txt, so that it looks like this:
***************************************
This is	the start of testing.txt
***************************************

I added this file from a new clone!

***************************************
This is	the end	of testing.txt
***************************************
Now commit and push this edit.
$ git add testing.txt
$ git commit -m "Adds a new line to testing.txt"
$ git push
Now switch over to the friend clone.
$ cd ../molecool_friend
We are going to add another line to testing.txt, so that it looks like this
I added this file from a new clone!
Now I added a new line!
Now try committing and pushing the change:
$ git add testing.txt
$ git commit -m "Adds another line to testing.txt"
$ git push
To https://github.com/YOUR_GITHUB_USERNAME/molecool.git
 ! [rejected]        main -> main (fetch first)
error: failed to push some refs to 'https://github.com/YOUR_GITHUB_USERNAME/molecool.git'
hint: Updates were rejected because the remote contains work that you do
hint: not have locally. This is usually caused by another repository pushing
hint: to the same ref. You may want to first integrate the remote changes
hint: (e.g., 'git pull ...') before pushing again.
hint: See the 'Note about fast-forwards' in 'git push --help' for details.
The push failed, because the friend clone is not up-to-date with the repository on GitHub.
We can fix this by doing a pull:
$ git pull
remote: Enumerating objects: 9, done.
remote: Counting objects: 100% (9/9), done.
remote: Compressing objects: 100% (4/4), done.
remote: Total 6 (delta 3), reused 5 (delta 2), pack-reused 0
Unpacking objects: 100% (6/6), done.
From https://github.com/YOUR_GITHUB_USERNAME/molecool
   754da2b..de54818  main     -> origin/main
Auto-merging testing.txt
CONFLICT (content): Merge conflict in testing.txt
Automatic merge failed; fix conflicts and then commit the result.
Unfortunately, the pull also failed, due to a conflict.
To see which files have the conflict, we can do:
$ git status
On branch main
Your branch and 'origin/main' have diverged,
and have 1 and 2 different commits each, respectively.
  (use "git pull" to merge the remote branch into yours)

You have unmerged paths.
  (fix conflicts and run "git commit")
  (use "git merge --abort" to abort the merge)

Changes to be committed:

	modified:   .gitignore

Unmerged paths:
  (use "git add <file>..." to mark resolution)

	both modified:   testing.txt
The conflict is in testing.txt, so let’s open it up:
***************************************
This is the start of testing.txt
***************************************

I added this file from a new clone!
<<<<<<< HEAD
Now I added a new line!
=======

***************************************
This is the end of testing.txt
***************************************
>>>>>>> 12651a37de10d61d9e9eea31c260c15b7ef3b5d4
The conflict is shown within the <<<<<<< and >>>>>>> bits.
The part before the ======= is what we added in the commit in the devops_friend clone, while the part after it comes from the original local clone.
We need to decide what to do about the conflict, tidy it up, and then make a new commit.
Edit testing.txt so that it reads:
***************************************
This is the start of testing.txt
***************************************

I added this file from a new clone!
Now I added a new line!

***************************************
This is the end of testing.txt
***************************************
$ git add .
$ git commit -m "Fixed merge conflicts in testing.txt"
$ git push
This time everything should work correctly. Generally speaking, your procedure when ready to commit should be:
$ git commit -m "Commit message"
$ git pull
$ <fix any merge conflicts>
$ git push
More GitHub Features
Navigate to the GitHub page for your project. Click on “testing.txt”. Here you can see the file and make changes to it. Click the edit button, which looks like a small pencil near the upper right of the file text box. Add a line that says “I added this line from the GitHub web interface!”, so that the file looks like:
***************************************
This is the start of testing.txt
***************************************

I added this file from a new clone!
Now I added a new line!
I added this line from the GitHub web interface!

***************************************
This is the end of testing.txt
***************************************
Scroll to the bottom of the page and write the name “Added a line to testing.txt from the web interface” for this commit. Then, click the green “Commit changes” button at the bottom left. You should now see that your change appears in the text box.
Click the “Blame” button to find out who is responsible for each line of code. Click the “History” button to see a list of all commits that affected this file. You can click on a commit to see exactly what it did.
Go back to the main project page, and click the “commits” button. Here you can see a list of all the commits for this project. Clicking them reveals how they changed the code.
The “Issues” tab lets you create discussions about bugs, performance limitations, feature requests, or ongoing work that are shared with everyone else who is working on the project. Try filling out a quick issue now. Then comment and close the issue.
These materials were taken directly from Python Package Best Practices lesson by the Molecular Sciences Software Institute (MolSSI).
Nash, J., Altarawy, D., Barnes, T., Ellis, S., Marin Rimoldi, E., Pritchard, B., & Smith, D. (2018). Best Practices in Python Package Development (Version 2020.12.0). The Molecular Sciences Software Institute. https://doi.org/10.34974/2H9M-0E15
More Tutorials
If you want more git, see the following tutorials.
Basic git
- Software Carpentry Version Control with Git
- GitHub 15 Minutes to Learn Git
- Git Commit Best Practices
Key Points
You can use GitHub to store your project online where you or others can access it from a central repository.
You can use GitHub to store your projects so you can work on them from multiple computers.
Code Collaboration using GitHub
Overview
Teaching: 30 min
Exercises: 5 minQuestions
How can others contribute to my project on GitHub?
How can I contribute to the projects of others?
Objectives
Learn what a fork is on GitHub
Understand how to open a pull request.
Repository collaborators
Now that we know the basics of git, we might want to know about code collaboration. There are several ways for people to contribute to your project. If you are working with a small number of people who you know well, you may simply choose to add them as collaborators to your repo. This will give them the ability to push to your repository.
To add collaborators to your project, navigate to your repository on GitHub Click the “Settings” button to the right of the little gear. This will take you to some options that will help you to maintain your repository.
This page lets you do several important things, including rename, relocate, transfer, or delete your repository.
Underneath the “Features” heading you will notice an option to “Restrict editing to collaborators only”. This option prevents random strangers from being able to push changes to your repository, and should always be kept on. To allow other people to work with you, you can assign collaborators. Click the “Manage access” tab on the left. This will bring up a page where you can see some details about your repository. The box under the heading “Manage access” will allow you to invite collaborators to your project.
A pop up with a search bar will appear where you can search for the names of other github users. By finding someone using the search bar and then clicking “Add collaborator”, you can allow specific people to contribute to your project. Generally speaking, you should only list someone as a collaborator if you work with them closely and trust that they won’t do anything especially unwise with your repository.
Adding them to the repository as a collaborator will allow them to push to the repository the same way you do.
People you don’t know very well shouldn’t be listed as collaborators, but there are still ways for them to contribute improvements to your project.
Protecting your main Branch
If you choose to work with collaborators, there are still ways for you to protect your code. Click the “Branches” tab. You will see a heading which says “Branch protection rule”. Adding the name of a branch here will make it a “protected branch” and the rules you choose in the section below will protect the branch (under the heading “protect matching branches”). For example, you may want to choose to protect the main branch so that pull requests and reviews are required to change the branch. This way, your collaborators will not be able to push to the main branch, and must submit a pull request more on this later in order for their changes to be incorporated. You can read more about branch protection here.
Pull Requests - Branch and Pull Request (PR)
Protecting your main branch will require contributors to submit their changes through a process called a Pull Request. As the repository owner, you can also change the code through a pull request on GitHub.
Previously, we discussed that all changes should take place on branches. This is still true, however, we are now going to incorporate those changes through a pull request on GitHub rather than through a merge.
Create a new branch in your repository to make a small change.
$ git checkout -b collab_instructions
Add the following to your README and commit the change.
To submit your feature to be incorporated to the main branch, you should submit a `Pull Request`. The repository maintainers will review your pull request before accepting your changes.
$ git add README.md
$ git commit -m "add collaboration instructions to readme"
We want these changes incorporated into the main branch. You could do as we did before and switch to the main branch, merge then changes, and push to GitHub for the changes to be present there on the main branch. If you are the repository owner, this will work even if you have branch protection rules. However, if you are not, your push from main will be rejected by GitHub.
We will want to push to a new branch on the repo then open a pull request.
$ git push origin collab_instructions
You will get an output similar to the following:
Enumerating objects: 5, done.
Counting objects: 100% (5/5), done.
Delta compression using up to 8 threads
Compressing objects: 100% (3/3), done.
Writing objects: 100% (3/3), 470 bytes | 470.00 KiB/s, done.
Total 3 (delta 2), reused 0 (delta 0)
remote: Resolving deltas: 100% (2/2), completed with 2 local objects.
remote:
remote: Create a pull request for 'collab_instructions' on GitHub by visiting:
remote:      https://github.com/YOUR_USERNAME/molecool/pull/new/collab_instructions
remote:
To https://github.com/YOUR_USERNAME/molecool.git
 * [new branch]      collab_instructions -> collab_instructions
This message tells you that a new branch has been created on your repository, and also tells you that you may want to open a pull request. You can click this link or copy and paste it to open a pull request. Write a description of the pull request in the box, then click “Create Pull Request”.
Once the PR is created, you will see a page describing the PR. On the top of the repo, you should see a button called “Pull Requests” and it should show that one is open for your repo. You can then choose to review the PR, or in this case you can just merge it without a review. To review a PR, click the ‘Files changed’ tab. You can review the changes (green Review changes button). Since you are looking at your own PR, you won’t be able to “Approve” if you have put in the branch protection rule. However, you can comment on and merge the changes if you wish.
This kind of workflow is fine if you and everyone contributing has write access to the repo. However, this will sometimes not be the case and you will want to contribute to repos where you do not have write access. In the next couple of sections, we will explore how this works in detail.
Forks
We have seen how it is possible to allow other people to contribute to a project by listing them as collaborators. This works fine for a project that only a handful of people work on, but what about large open-source projects that might have hundreds of people who are interested in adding their own features? No one wants to add all of those names to the list of collaborators, and giving everyone who asks the ability to push anything they want to the repository is guaranteed to lead to problems. The solution to this question comes in the form of “forks.”
Unfortunately, the word “fork” has multiple possible meanings in the context of open-source software development. Once upon a time, open-source software developers used the word “fork” to refer to the idea of taking an existing software project, making a copy of it, changing the name, and then developing it completely independently of the original project. For the purpose of this discussion, every time we use the word “fork,” we mean what happens when you push the fork button in GitHub.
A fork is a copy of a repository that is largely independent of the original. The maintainer of the original repository doesn’t have to do anything or know about the existence of the fork. Want to make changes to an open-source project, but aren’t listed as a collaborator on the project? Just make a fork, which you own and can manage in the same way as any other repository that you create on GitHub. If you want to submit changes to the project’s official repository, you can create a “pull request”, which we will discuss in more detail in the next section.
For now, we will learn how to create and maintain a fork.
During this section, we will all fork a central repository, make changes, then submit something called a Pull Request to have those changes incorporated into the code. We will leave the package we are developing for this section.
Navigate to the URL https://github.com/molssi-education/periodic-table in your web browser. You should see a GitHub repo. This repository contains code to make a website which has the periodic table. View the website https://molssi-education.github.io/periodic-table/ . On the website page, elements which appear with a red background have a page and information filled in. You can read more about each element by clicking on it. Elements with a white background do not yet have a page. Take a minute or two to click around.
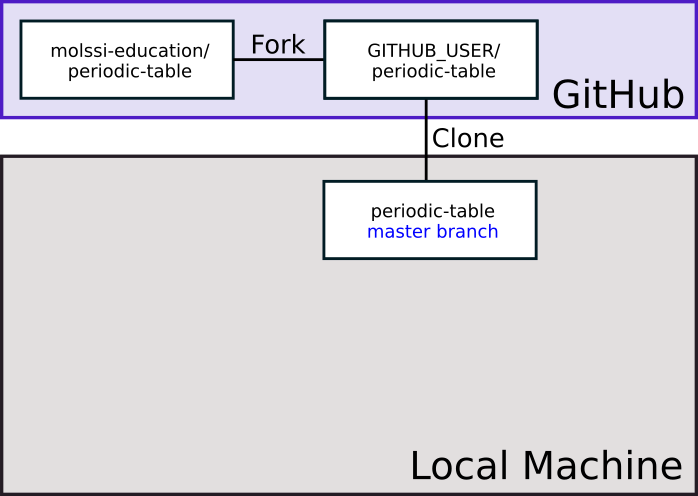
Create a personal fork of the repository by pressing the “Fork” button near the top right of the web interface. GitHub will copy the repository to your profile. It should automatically redirect when it’s done. You should notice at the top of the page, the name of the repository has a ‘fork’ symbol by it. It should say ‘YOUR_USERNAME/periodic-table’, and under that say ‘forked from molssi-education/periodic-table.’
You can use the following diagram to visualize what you just did.

Then, make a clone of the fork on your personal computer. Before you make the clone, MAKE SURE YOU ARE NOT IN A GIT REPOSITORY.
Type
$ git status
You should see the message
fatal: not a git repository (or any of the parent directories): .git
If you do not see this message, navigate using cd until you do.
Next, clone the repository to your computer. Use the green button (Clone or download) on your fork to get the fork URL.
$ git clone <fork URL>
$ cd periodic-table
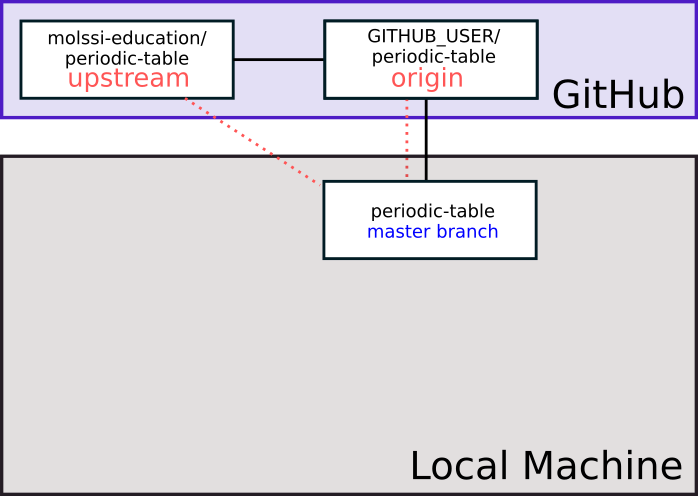
Now, when we visualize what our repositories look like, we have a copy of our fork on our local machine.
In a real development situation, we would also create a new conda environment for developing in this repository.
Adding an upstream to our forks
In your terminal window, type
$ git remote -v
You should see output similar to the following
origin https://github.com/YOUR_GITHUB_USERNAME/periodic-table.git (fetch)
origin https://github.com/YOUR_GITHUB_USERNAME/periodic-table.git (push)
This is similar to our own repository. However, since this is fork, we will want to add another remote to track the original repository. The standard names for remotes are origin for the repository we have cloned from, and upstream for the repository we forked from. Add an upstream using the following command
$ git remote add upstream https://github.com/molssi-education/periodic-table.git
Now, when you check the remotes (git remote -v), it should list both the origin, and upstream repositories. If we wanted to pull changes from the original repo, we could do git pull upstream branch_name
Next type
$ git fetch upstream
To get a copy of the upstream repository. This will be in a hidden branch. You should be able to see both the origin and upstream hidden branches by typing
$ git branch -a
We will use remotes/upstream/main to keep track of new changes that happen upstream that we do not have in our local main.
Developing a new feature - creating branches
We will implement a new element for the webpage.
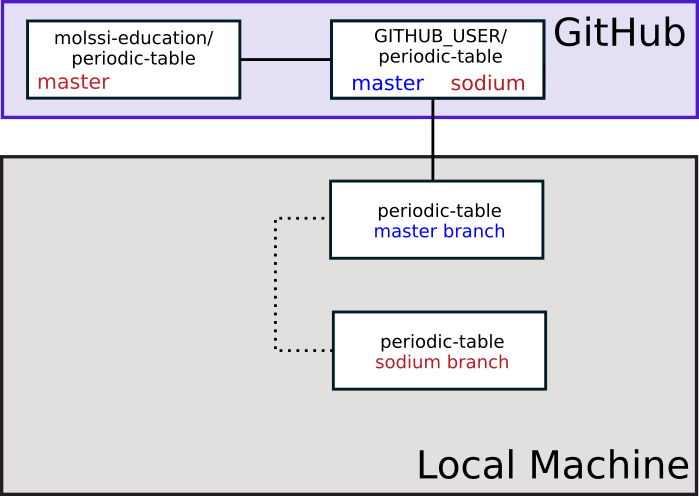
Create a new branch in your repo with your element of choice. For this demo, I will be editing the sodium page. You should choose another element. This can either be an element that exists (red background), or an element that doesn’t exist yet (white background).
$ git checkout -b sodium
This command creates the branch and checks it out (the -b stands for branch). Alternatively, we could have used the commands git branch sodium and git checkout sodium. In general, your branch name should describe the feature or changes that you plan to make on the branch.
You will see the output
Switched to a new branch 'sodium'
We have now created a new branch called sodium and checked it out.
More about branching
When creating a new feature, it is a good practice to develop each feature on a new branch in the new repository. Branching in git is exactly what it sounds like. You can create a branch from a certain commit (when using the git branch command), and when you switch to that branch, it is an independent copy of the repository moving forward from that branch point.
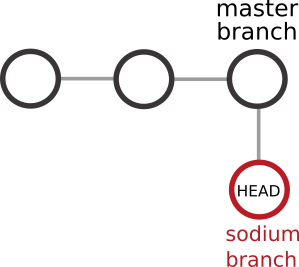
Before branching, imagine a git commit history that looks like this. In the diagram below, each circle represents a git commit. There have been two commits, and the HEAD is currently after commit 2.

After we have created a new branch and checked it out, we can imagine our git history looking like this. The sodium branch ‘branches’ or starts from the point where we used the git branch command.
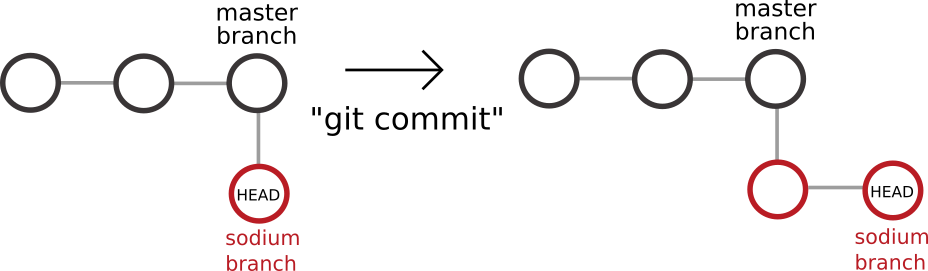
Now, when we make a commit on the sodium branch, our changes will continue from this point, leaving the main branch unchanged. Note that we have not yet made a commit, but this diagram is for illustrative purposes.
The importance of branching
When you are doing development, particularly on a fork (but also if you are collaborating), it is very important that all development work be done on a branch. In the case of a collaborative repository where you are pushing directly, this will allow you to do pull requests from branches (more on pull requests below), and that your code is reviewed by another developer on the project before being merged to the main branch.
The most important reason to work on a branch is to keep your main branch clean. In the workflow you are learning today, the main branch should track upstream, and only be changed by pulling from upstream. This will ensure that you always have a working piece of software on the main branch. It will make it easier to correct mistakes if they arise, and keep your repository clean if you have multiple collaborators.
Editing our element
Now it’s time to edit our periodic table element. If you have picked an element which exists already, there will be a file with the name element_name.md where element name is the element you’ve chosen. If the file does not exist, create it.
For example, to create the sodium file,
$ touch sodium.md
Once the file is created, open it in your text editor of choice. It is important that every element have the following at the top of the page (note - spacing is very important!)
---
layout: page
title: ELEMENT_NAME
---
If you are creating a new page, fill in the appropriate element name. Add some text about the element below the heading. For example, our sodium page might look like the following.
---
layout: page
title: Sodium
---

Symbol : Na
Atomic Number : 11
Save your file after you edit it.
Testing out the website
If you have jekyll installed, you can view a local copy of the webpage. This is not a necessary step. If you do not have jekyll installed, or do not wish to install Jekyll skipt this step.
Execute the command
$ bundle exec jekyll serve
in the terminal the top level of your project to render a local copy of the webpage. Naviage to the local address to view your website and make sure your new element is working.
Committing the change
Let’s add and commit these changes.
$ git add elements/YOUR_ELEMENT.md
$ git commit -m "update YOUR_ELEMENT page"
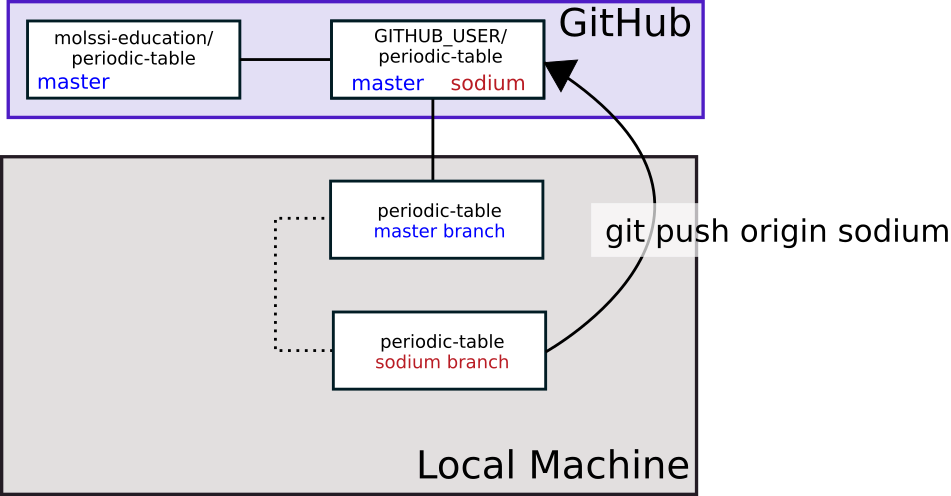
Next, we must push these changes. But, where do we want to push the changes? We would like to have our changes incorporated into the central repository, but do not have permission to push upstream. We will have to push to origin (our repository) on the sodium branch (or whatever branch you’re working on), then we will request that the maintainers of the upstream repository incorporate our changes, or pull from our repository. This is why it is called a Pull Request. We are literally requesting them to pull from our repository.
$ git push origin sodium
Here, the last line indicates that we are pushing to origin (our fork) to the sodium branch. The branch name you type in place of sodium should match the name of the branch you are working on. If you view your repository on GitHub, you should now see that you have another branch in addition to the main branch.
As part of the output from this command, you should see the following:
remote:
remote: Create a pull request for 'sodium' on GitHub by visiting:
remote:      https://github.com/YOUR_GITHUB_USERNAME/periodic-table/pull/new/sodium
remote:
git is correct. What we will want to do next is create a pull request on the original repository to get our changes incorporated.
Pull requests
It is now time to incorporate the edits you have made in your fork into the original repository.
To do this, we must create a Pull Request.
Navigate to the URL of your fork. You should see a highlighted area and green button which says “Compare and Pull Request”. Alternatively, you can navigate to the URL given in the message where you did a push.
Once you are on the page that says “Open a pull request”, you should see fields which ask for the name of the pull request, as well as a larger text box which has space for a description. Make the title of this pull request “add sodium page”. Edit the description to describe what you have done in your pull request.
Submit the pull request.
Now, the maintainers of the repository can review your material, and request changes if they feel it necessary.
Anyone can see Pull Requests on public repositories. Try reviewing a few pull requests on the periodic table repository. You can leave comments/reactions. Take a few minutes to review someone else’s pull request.
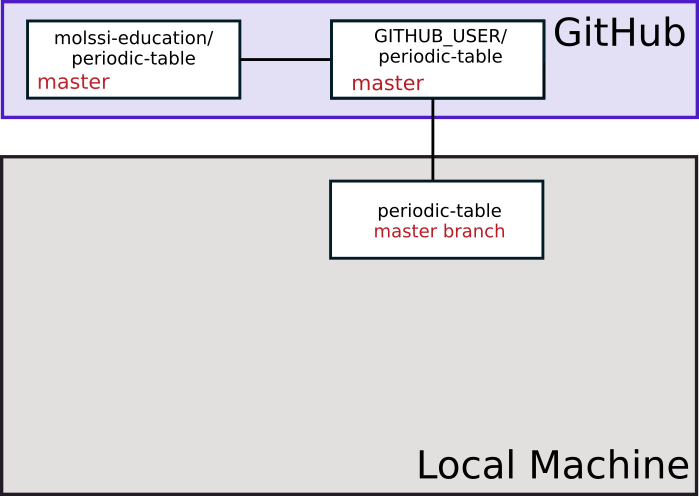
Once your changes have been accepted, upstream will have those changes on the main branch. This is indicated in the figure below through the change in color of the the word ‘main’.
Incorporating upstream changes to local
After your change has been accepted to upstream, you will want to incorporate the changes into your local main branch. First, switch to your main branch.
$ git checkout main
You can get changes to your local main by either doing a git pull from upstream main, or by doing a git fetch from upstream main, followed by a merge. For now, just do a pull.
$ git pull upstream main
Next, you will want to update your origin main. Push from the local main to origin.
$ git push origin main
Now, your upstream main and origin main should be at the same point.
If you are done working with your feature branch, you can now delete it.
$ git branch -d sodium
The -d option means to delete the branch.
To delete the branch on your origin repository on GitHub, you can use teh command
$ git push origin --delete sodium
These materials were taken directly from Python Package Best Practices lesson by the Molecular Sciences Software Institute (MolSSI).
Nash, J., Altarawy, D., Barnes, T., Ellis, S., Marin Rimoldi, E., Pritchard, B., & Smith, D. (2018). Best Practices in Python Package Development (Version 2020.12.0). The Molecular Sciences Software Institute. https://doi.org/10.34974/2H9M-0E15
More Tutorials
If you want more git, see the following tutorials.
Branching
Rebasing
Key Points
To contribute to someone else’s project, you should fork their repository.
All development work should be done on a new branch. Each branch should implement one feature.
Once you’ve implemented a new feature, push to your repository and create a pull request on the original repo.
Licensing and citation
Overview
Teaching: 10 min
Exercises: 0 minQuestions
What licensing information should I include with my work?
How can I enable others to cite my work?
Objectives
Explain why adding licensing information to a repository is important.
Choose a proper license.
Explain differences in licensing and social expectations.
Make your work citable by generating a digital object identifier (DOI) for your work
Licensing
When a repository with source code, a manuscript or other creative
works becomes public, it should include a file LICENSE or
LICENSE.txt in the base directory of the repository that clearly
states under which license the content is being made available. This
is because creative works are automatically eligible for intellectual
property (and thus copyright) protection. Reusing creative works
without a license is dangerous, because the copyright holders could
sue you for copyright infringement.
A license solves this problem by granting rights to others (the licensees) that they would otherwise not have. What rights are being granted under which conditions differs, often only slightly, from one license to another. In practice, a few licenses are by far the most popular, and choosealicense.com will help you find a common license that suits your needs. Important considerations include:
- Whether you want to address patent rights.
- Whether you require people distributing derivative works to also distribute their source code.
- Whether the content you are licensing is source code.
- Whether you want to license the code at all.
Choosing a license that is in common use makes life easier for contributors and users, because they are more likely to already be familiar with the license and don’t have to wade through a bunch of jargon to decide if they’re ok with it. The Open Source Initiative and Free Software Foundation both maintain lists of licenses which are good choices.
This article provides an excellent overview of licensing and licensing options from the perspective of scientists who also write code.
At the end of the day what matters is that there is a clear statement as to what the license is. Also, the license is best chosen from the get-go, even if for a repository that is not public. Pushing off the decision only makes it more complicated later, because each time a new collaborator starts contributing, they, too, hold copyright and will thus need to be asked for approval once a license is chosen.
Can I Use Open License?
Find out whether you are allowed to apply an open license to your software. Can you do this unilaterally, or do you need permission from someone in your institution? If so, who?
What licenses have I already accepted?
Many of the software tools we use on a daily basis (including in this workshop) are released as open-source software. Pick a project on GitHub from the list below, or one of your own choosing. Find its license (usually in a file called
LICENSEorCOPYING) and talk about how it restricts your use of the software. Is it one of the licenses discussed in this session? How is it different?
All the materials for the license section is taken directly from the Version Control with Git lesson by the software carpentry.
Making your project citable
Discussion: is depositing your data/code on GitHub enough?
- Consider the aspect of findability 5 or 10 years from now.
- What could go wrong?
There are many services where you can share or archive your code and data: See for instance our lesson on reproducible research.
In this present lesson we will discuss one of the many options to get a digital object identifier (DOI) for your dataset or code: Zenodo, A general-purpose open access repository created by OpenAIRE and CERN. Zenodo has nice integration with GitHub, and allows researchers to upload files up to 50 GB.
We will exercise in the Zenodo sandbox
We will practice on https://sandbox.zenodo.org/ and not on the “real” https://zenodo.org/ to make sure we do not create “real” DOIs which we cannot remove.
The sandbox service is useful to calibrate your setup until you are happy with the result and then you can go for the real service. Once a dataset is uploaded to the “real” service, it cannot be easily removed or modified again (and this is good, otherwise DOIs would not make much sense).
Step 1: Prepare an example repository
Through web:
- Create a new repository on GitHub
- Upload some example data into it
Or using GitHub Desktop:
- Create a new repository
- Commit some example data
- Publish your example repository to GitHub
Alternatively we can also practice this with one of the repositories we created earlier in this lesson.
Step 2: Activate the repository on Zenodo (sandbox)
We will exercise in the Zenodo sandbox
We will practice on https://sandbox.zenodo.org/ and not on the “real” https://zenodo.org/ to make sure we do not create “real” DOIs which we cannot remove.
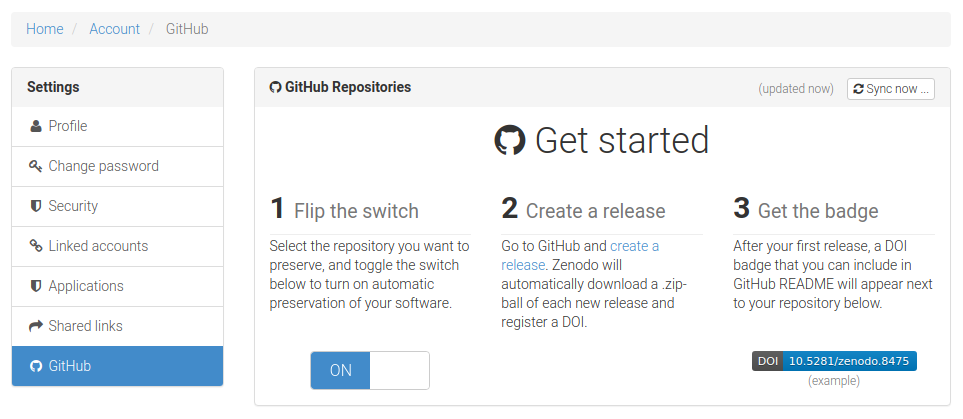
- Select the repository you wish to preserve:
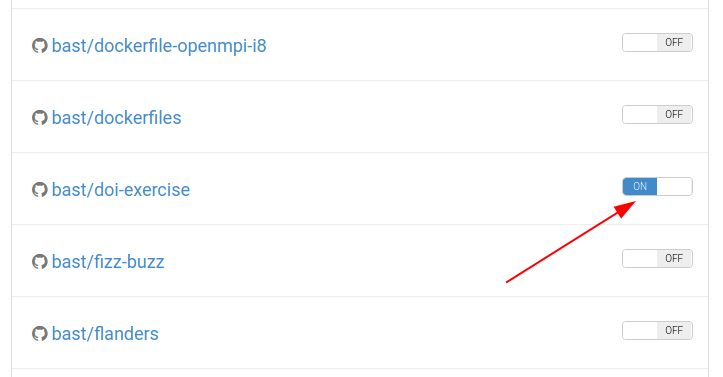
- If it is not there, you may need to “Sync now …”:
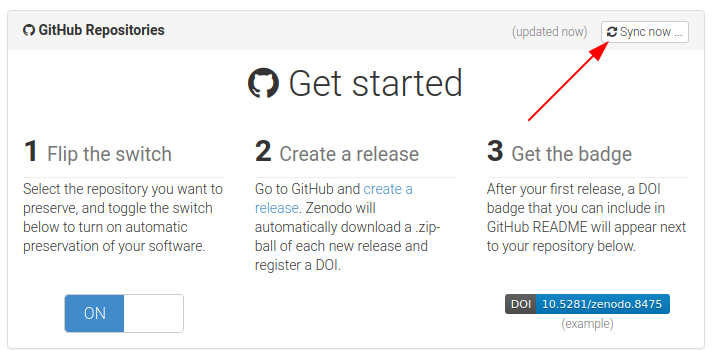
Step 3: Create a “release” and get a DOI
- Go back to the webpage of your GitHub repository
- Click on “releases”:
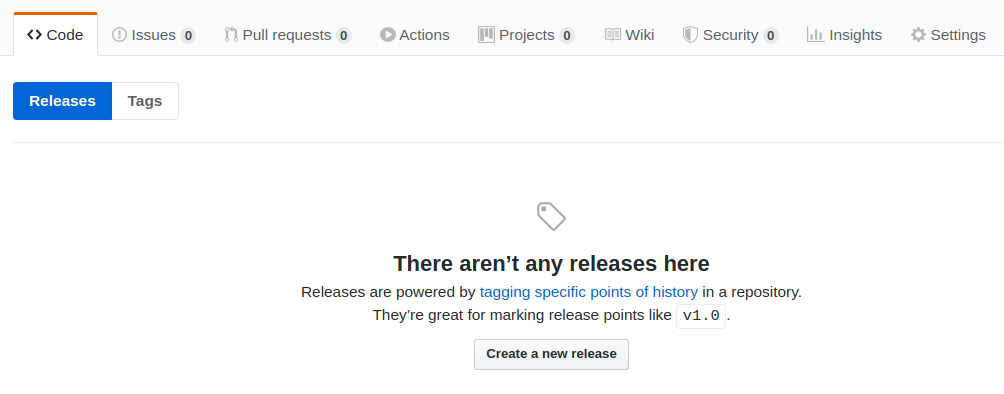
- Fill out the form and click on “Publish release”:
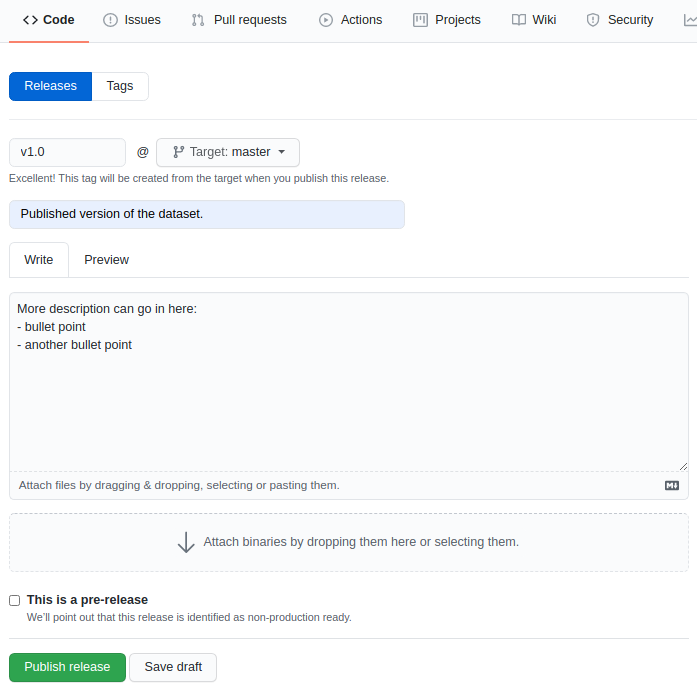
- Finally reload https://sandbox.zenodo.org/account/settings/github/
- It can take few moments for the project to be deposited
- After a while it turns to this:
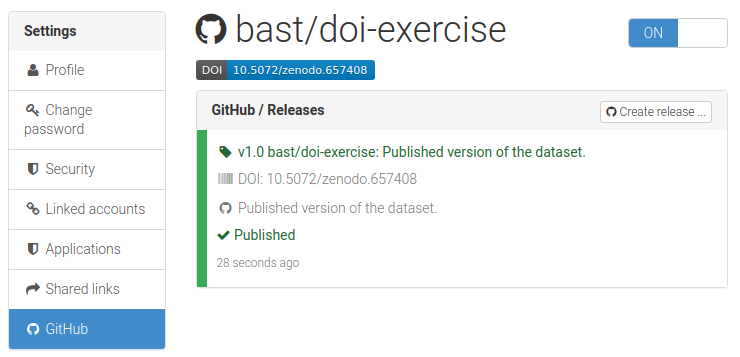
Step 4: Add a DOI badge to your repository
This is bonus but for visitors of your GiHub repository it can be nice to find a badge in your README that informs them about and links to the preserved dataset/code on Zenodo.
- On Zenodo, click on the badge (last figure) which opens up:
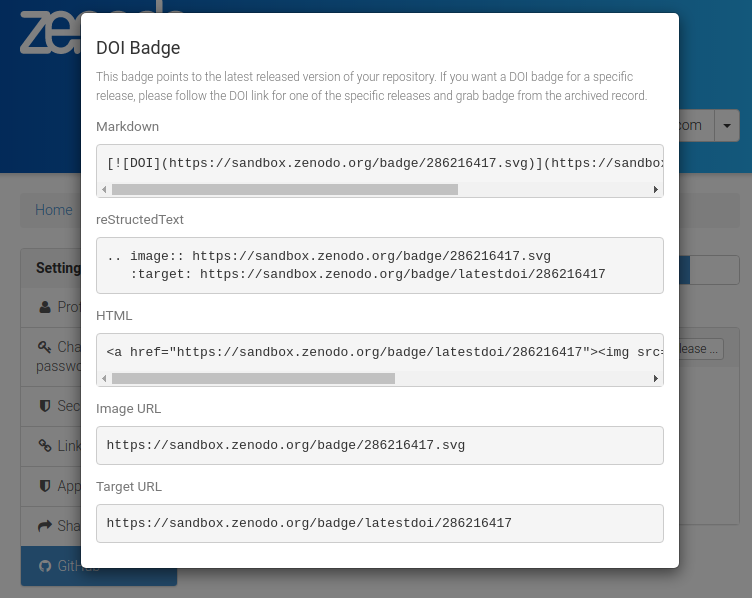
- Try to add such a badge to your README for the exercise repository:
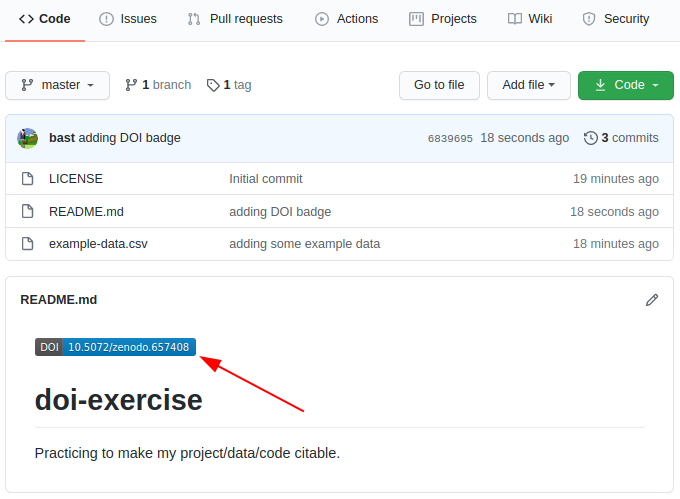
All the materials for this Zenodo section is taken directly from the Collaborating and sharing using GitHub without command line lesson by coderefinery.
Key Points
People who incorporate General Public License (GPL’d) software into their own software must make their software also open under the GPL license; most other open licenses do not require this.
The Creative Commons family of licenses allow people to mix and match requirements and restrictions on attribution, creation of derivative works, further sharing, and commercialization.
People who are not lawyers should not try to write licenses from scratch.
It’s highly recommended to get a digital object identifier (DOI) for your dataset or code